[fc-banner bg_img="url(https://cdn.shopify.com/s/files/1/1569/9031/files/LiveFire_Hero3-blue.jpg?1425)" bg_color="#f8f7f7" subhead_color="#f8f7f7" subhead=" " title_color="#f8f7f7" title="When to use Metal vs. Wood Utensils on Cast Iron Cookware" content_color="#f8f7f7" arrow_color="#f8f7f7" intro="Does it really make a difference what type of utensils you use on cast iron?"] [fc-content-caption-right-start]
The most important factor when choosing cooking utensils for cast iron is they must be able to withstand high temperatures. Wood, metal, and silicone are safe; plastic is not. At Field Company, we generally prefer using natural materials so we’re going to focus on wood and metal (stainless steel).
In this comprehensive guide, we'll explore when to reach for metal, when to opt for wood, and the specific benefits of Field Company's metal turners and wooden utensils. While personal preference and cooking style play a role in utensil selection, understanding the strengths of metal and wood can help you optimize your cooking experience.[fc-content-caption-right-end] [fc-toc-start title="Table of Contents"]
[fc-toc-end][fc-content-caption-right-start]
When to Reach for Metal Utensils in Cast Iron Cooking
[fc-content-caption-right-end]
[fc-image-caption-right caption="Field Company's Griddle Turner" img_url="https://cdn.shopify.com/s/files/1/1569/9031/files/griddle_turner_burger.png?v=1714143821"]
[fc-content-caption-right-start]
There are a few specific uses when we reach for a stainless steel utensil while cooking. We recommending using metal utensils when:[fc-content-caption-right-end]
[fc-content-number-start number="1"]
You are searing proteins. Reach for metal when you’re building a nice brown crust (Maillard Reaction) on the surface of your food via long searing time. The sharp edges and precise control offered by metal utensils allow you to effectively slide between the food and the smooth surface of your cast iron pan, ensuring that the delicious crust remains intact.
[fc-content-number-end] [fc-content-number-start number="2"]
You are deglazing a pan. Depending on your dish, metal or wood works for this but we opt for metal when we want to scrape every last morsel from the pans’ surface, or if the fond (caramelized bits) is on the sticky side. As long as you maintain a shallow angle of the edge of the utensil to the pan, it should not leave any marks in your seasoning.
[fc-content-number-end] [fc-content-number-start number="3"]
You want to break up foods. The sharp edge can come in handy when breaking apart larger pieces or food into smaller ones: like fried potatoes, ground beef, sausage, etc.
[fc-content-number-end] [fc-content-number-start number="4"]
You are cooking with sticky foods. Anything that tends towards sticky (liquid that turns solid when cooked) will benefit from metal utensils — eggs, pancakes, melted cheese.[fc-content-number-end]
[fc-content-caption-left-start]
Myth vs. Fact: Do Metal Utensils Scratch Cast Iron?
A common belief is that one should not use metal utensils with cast iron because they will scratch, chip or damage your seasoning. While this certainly could happen, when used correctly high-quality metal utensils like those from Field Company are perfectly safe for cast iron.
Read more about how to use metal utensils safely on cast iron
If your seasoning is already brittle or flaking, a metal spatula can chip the seasoning. If this happens to you, we actually recommend using the spatula to chip off all the brittle seasoning so that you can start over, building up thinner, more even layers of seasoning that won’t be as prone to future flaking.
Likewise, if you run the edge of a spatula like a knife on the surface of your pan you risk leaving a scratch mark in your seasoning. This is, however, unlikely to hurt the performance of your seasoning and is mostly an eyesore. With a little TLC you can fill in a mark like this through more cooking and seasoning of your pan.
[fc-content-caption-left-end]
[fc-content-caption-right-start]
Field Company Stainless Steel Turners
At Field we offer two different types of stainless steel turners. They are both made with a full tang, stainless steel body and cherry wood handles, which provide durability that’s made to last.
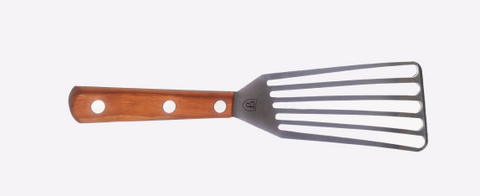
Slotted Chef Turner: One Spatula to Rule them All.
Also referred to as a fish spatula, this tool with it's finesse and feedback acts as an extension of a cook's hand. If you only have one spatula, this get this one.
[fc-content-caption-right-end] [fc-toc-start title="Slotted Turner Features"]
-
Flexible. Allows you to get under just about anything with delicate finesse. It bends and flexes, and has a slight upward curve to facilitate flipping. This comes in handy when you want to make sure your crust stays connected to delicate or crumbly foods where brute force might accidentally sever or smush: think fish, falafel, fried eggs,or pancakes.
-
Sharp Edge. A thin sharp edge and pointed tip allow you to easily pry under foods to separate from the pan.
-
Highly Maneuverable. The size, flexibility, and angle make it useful with smaller-size skillets, as well as larger-sized cast iron.
[fc-toc-end] [fc-content-caption-right-start]
Griddle Turner: The Heavy-Duty Champ

Our Griddle Turner is going to perform best on our larger cast iron pieces, where there is either plenty of space to maneuver or low side walls that won’t interfere with the entrance angle.
[fc-content-caption-right-end] [fc-toc-start title="Griddle Turner Features"]
-
Rigid. This means you can put more force into the tool and with precision of movement you can move fast, like flipping a dozen burgers or several pieces of bacon at once. The reduced flexibility means the feedback is direct and clear.
-
Heavy Duty. It will comfortably hold more weight during a flip, making it a better choice for big proteins. The wide flat surface also allows it to be used as a press for things like smash burgers or grilled sandwiches.
-
Sharp Edge. Just like the chef’s slotted turner, a thin sharp edge and pointed tip allow you to easily pry under foods to separate from the pan.
[fc-toc-end] [fc-content-caption-left-start]
When to Reach for Wood Utensils in Cast Iron Cooking
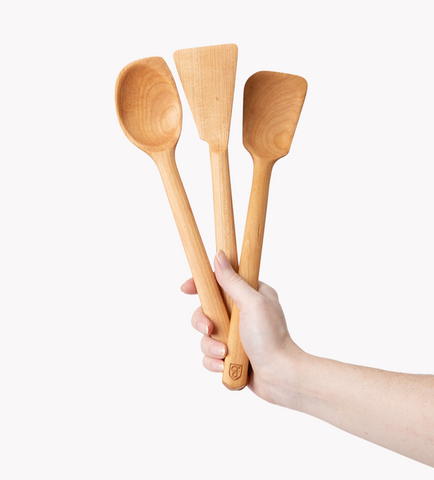
[fc-content-caption-right-end] [fc-image-caption-left caption="Set of 3 Cherry Wood Spoons & Spatulas" img_url="https://cdn.shopify.com/s/files/1/1569/9031/files/margritwenzel-fieldcompany-shot1_1.png?v=1714143986"]
[fc-content-caption-right-start]
We tend to prefer wood as our default when the specific performance of metal utensils doesn’t matter. We recommend using wood utensils when:[fc-content-caption-right-end][fc-content-number-start number="1"]
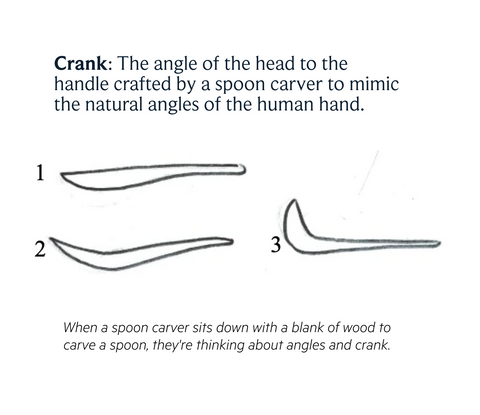
You don’t want your utensil to conduct heat. This is beneficial if the utensil is going to be in your pan frequently, whether from stirring a lot or because you leave it sitting on the edge of your skillet (no judgment, we do this all the time). Most importantly our wooden spoons shine when it comes to tasting your dishes-in-progress by keeping your lips safe from scalding metal, while also having an ideal crank to scoop liquids without spilling.
[fc-content-number-end] [fc-content-number-start number="2"]
You are constantly mixing or stirring. While we fully embrace using metal on cast iron, we do urge caution when wielding a sharp edge so as not to scratch your well-earned seasoning. Wood utensils on the other hand, can be used to aggressively stir, toss, sauté, and mix without worrying about side effects. Think sauces, chilis, stews, polenta, or stir frys.
[fc-content-number-end] [fc-content-number-start number="3"]
You prefer an aesthetically and tactilely pleasing experience. In addition to the natural beauty of wood grain, wood is quieter to use and more natural to hold, making them a preferred choice when all other things are equal. They also perform double duty as beautiful and functional serving utensils.
[fc-content-number-end]
[fc-content-caption-right-start]
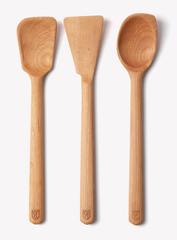
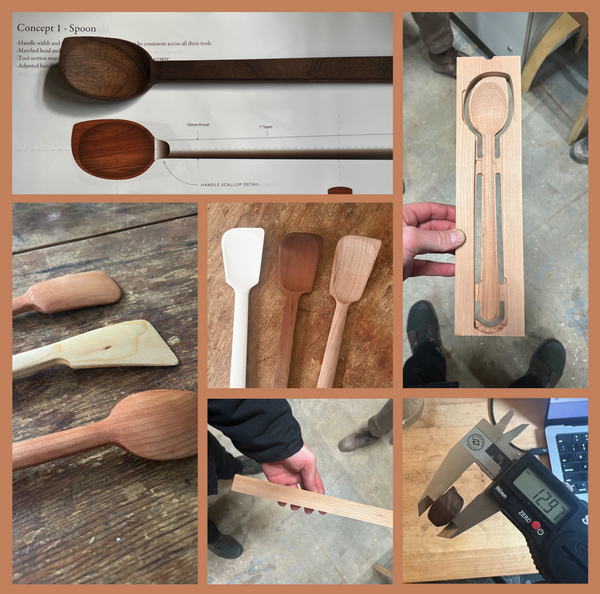
Field Company Wooden Spoons &Spatulas
Our set of 3 cherry wood utensils are designed with a handle that feels good to hold and a crank angle that works with the natural motions of your hands.
Each of them shines in specific situations:
-
Wooden Spoon: Does what spoons do best: stir, taste, scoop, and serve.
-
Wooden Spatula: The spatula has the sharpest edge for getting underneath things. We use it for frying, especially scraping up the fond with foods that caramelize a bit like onions and mushrooms. It’s also fantastic for scrambled eggs. The head shape is the right size to blend maneuverability with scoopability.
-
Wooden Spoonula: a hybrid—and one of the Field team's favorites. It provides some edge to scrape up food from a pan’s surface, but also has a bit of a bowl so your food does not fall out.
Read more about our wooden spoons design.
[fc-content-caption-right-end] [fc-content-caption-left-start]
Caring for Wooden Utensils
With proper care these utensils should last decades, if not a lifetime. All of our utensils are either 100% wood or have wood handles so we recommend hand washing in soapy water. Do not wash in the dishwasher.
Wood looking dry? Oil will revitalize dry wood and repel water. You can oil all surfaces of the wood with a cooking oil of your choice or mineral oil (or even our cast iron seasoning oil). If the grain of the wood gets fuzzy, you can simply sand it down while dry with a Scotch-Brite scour pad and then oil.
[fc-content-caption-left-end]
[fc-content-caption-right-start]
In conclusion, when cooking with cast iron, both metal and wood utensils have their place. Metal utensils excel at precision tasks like searing, deglazing, and handling sticky foods, while wood utensils are ideal for gentler techniques, like sautéing, and serving. At Field, we offer products in both of these categories that are sources with high-quality materials and made in the USA.
[fc-content-caption-right-end]
[fc-related-posts-start title="Other Posts You Might Enjoy" tagline="Cast Iron Care & Maintenance" see_more_url="/blogs/journal"] [fc-related-post image="https://cdn.shopify.com/s/files/1/1569/9031/files/clean-chain-mail-sq.jpg?v=1613672256" plain_in="" highlight="Cleaning Cast Iron" plain_out="with a Chain Mail Scrubber" tagline="Use this tool to keep your skillet clean and develop resilient seasoning." url="/pages/cleaning-cast-iron-chain-mail-scrubber"] [fc-related-post image="https://cdn.shopify.com/s/files/1/1569/9031/files/Wooden_spoons.png?v=1714146983" plain_in="" highlight="We've Got a New Angle on Wooden Spoons" tagline="Wood spoons and utensils are perfectly in line with Field Company values" url="/blogs/journal/weve-got-a-new-angle-on-wood-spoons"] [fc-related-post image="https://cdn.shopify.com/s/files/1/1569/9031/files/featured-image-cornbread-820.jpg?v=1613546347" plain_in="How to" highlight="Make Cornbread" plain_out="in a Cast Iron Skillet" tagline="Why cooking in your cast iron is the key to perfect cornbread crust" url="/blogs/journal/field-skillet-cornbread"] [fc-related-posts-end]
]]>


 [fc-content-caption-right-end]